Accessing the Document Center requires the Document Center privilege. The HR Data Management system's Document Explorer enables you to arrange, store, and oversee company documents and templates. Learn how to create and manage folders, add subfolders, upload files, modify folder and document names, and remove items.
Navigate to HR Data Management > Documents Explorer in the Left Navigation.
Adding folders, subfolders, and documents
The software comes with two main folders: Company Documents and Templates. To add folders, subfolders, and documents, select the applicable folder. The process is the same for both folders.
.png?sv=2022-11-02&spr=https&st=2026-01-23T05%3A16%3A08Z&se=2026-01-23T05%3A27%3A08Z&sr=c&sp=r&sig=sJWZ8b2rQzEqoPuLaqC8ySUaY4wlDUPOzYJAfYSSbxg%3D)
Click New Folder.
.png?sv=2022-11-02&spr=https&st=2026-01-23T05%3A16%3A08Z&se=2026-01-23T05%3A27%3A08Z&sr=c&sp=r&sig=sJWZ8b2rQzEqoPuLaqC8ySUaY4wlDUPOzYJAfYSSbxg%3D)
Enter the relevant folder name and click Save. For our example, we're adding a Contractors folder to the Company Documents main folder.
.png?sv=2022-11-02&spr=https&st=2026-01-23T05%3A16%3A08Z&se=2026-01-23T05%3A27%3A08Z&sr=c&sp=r&sig=sJWZ8b2rQzEqoPuLaqC8ySUaY4wlDUPOzYJAfYSSbxg%3D)
To add a subfolder, click New Folder and follow the same process.
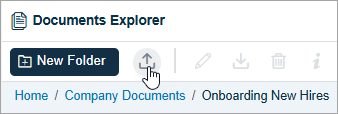
To upload documents to the new folder, click the upload arrow.
Click Browse and double-click or drag the applicable document from your local drive. Enter and select the pertinent details, and click Save.
.png?sv=2022-11-02&spr=https&st=2026-01-23T05%3A16%3A08Z&se=2026-01-23T05%3A27%3A08Z&sr=c&sp=r&sig=sJWZ8b2rQzEqoPuLaqC8ySUaY4wlDUPOzYJAfYSSbxg%3D)
Deleting folders, subfolders, and documents
To delete a folder or a document, select it and click the trash can icon. For our example, we're deleting a folder. Note: The process for deleting a document is the same.
.png?sv=2022-11-02&spr=https&st=2026-01-23T05%3A16%3A08Z&se=2026-01-23T05%3A27%3A08Z&sr=c&sp=r&sig=sJWZ8b2rQzEqoPuLaqC8ySUaY4wlDUPOzYJAfYSSbxg%3D)
Editing folders, subfolders, and documents
To edit the name of a folder or document, select the applicable one and click the edit icon.
Enter the new name and click Save.
.png?sv=2022-11-02&spr=https&st=2026-01-23T05%3A16%3A08Z&se=2026-01-23T05%3A27%3A08Z&sr=c&sp=r&sig=sJWZ8b2rQzEqoPuLaqC8ySUaY4wlDUPOzYJAfYSSbxg%3D)
You're done! 😊👍
If you have questions, please call us at (888) 783-1493, email support@workeasysoftware.com, or submit a ticket