Employees may manually record worked hours on their My Portal timesheet when they forget to clock in/out or need to add hours retroactively. This guide explains how to access the Add Time feature, complete the required fields, and submit the entry for approval.
Introduction
What the feature does: allows employees to add time entries or durations directly to their timesheet when normal punches are missing.
Business context: accurate timekeeping ensures correct payroll and compliance. Manual entries must still be reviewed and approved by a manager or administrator.
Configuration dependencies:
The Add Time option appears only if you have permission and the pay period is open. If you do not see Add Time, contact your manager or administrator.
If Job Costing is configured to require a Job, you must select the final required Job level before you can add a manual time or duration entry.
Prerequisites
You have access to My Portal and the Timesheets area.
Your pay period is open for editing (you cannot add time more than 60 days in the past).
A job and work location are assigned to you.
Steps
Navigation
My Portal > Timesheets > Timesheet
Open your timesheet.
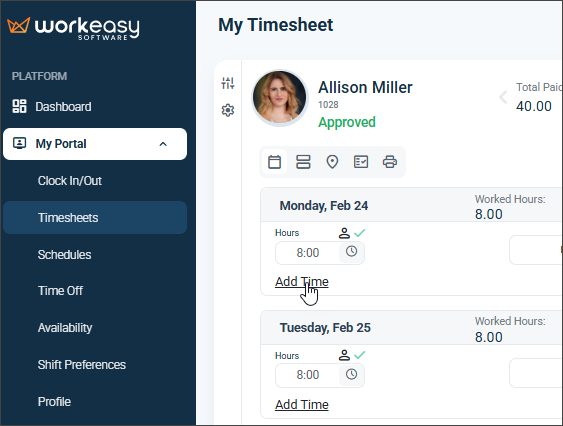
Click My Portal, then select Timesheets from the navigation panel. Your current pay period displays a list of dates. Locate the day that needs a time entry.To start a new entry, click the Add Time link next to that date or click the floating + button to add time for any day.
Choose the entry type.
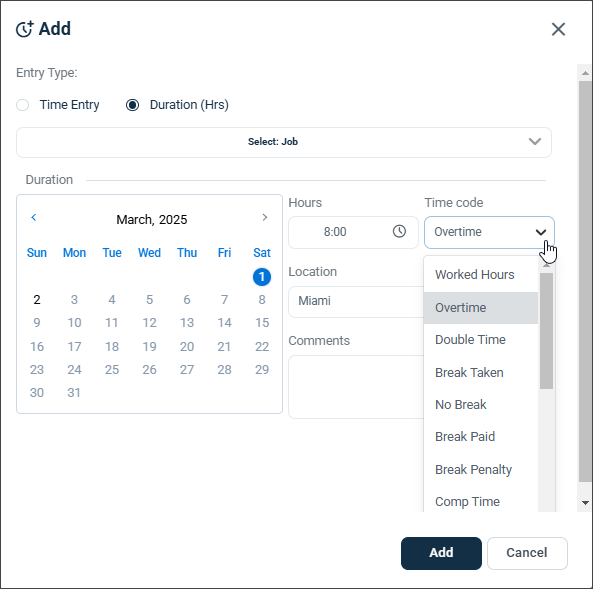
In the Add Time window, select Time Entry (default) or Duration (Hrs).Time Entry: records specific clock‑in and clock‑out punches.
Duration: records a flat number of hours without times.
Complete the required fields.
Job / Location: select the appropriate job and work location.
Date and Time: confirm the date and select the start time (or enter total hours for Duration).
Punch Type: choose Automatic, In, Out, Start Break, End Break or In (Start Shift).
Time Code: select the code (e.g., Worked Hours, Overtime, Vacation).
Notes: enter optional comments explaining why the entry is being added.
From / To / Hours / Is an Adjustment: specify the date range and total hours if you are adding hours for multiple days or adjusting a previous pay period.
Add Entry: click Add Entry to insert another punch or duration segment for the same day.
Add and save the entry.
Click Add to insert the entry into your timesheet.
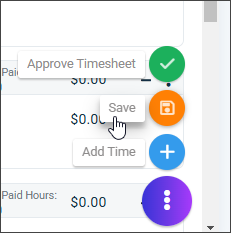
After closing the modal, open the ellipsis menu and select Save. Then click Approve Timesheet to submit it for approval.
Notes:
Time can only be added up to 60 days in the past.
Added time is not saved automatically; always click Save after adding or editing entries to avoid data loss.
If you do not see Add Time, your permissions may not allow manual entries. Contact your manager or administrator.
Time Entry and Duration Options
Time Entry (Default)
Use Time Entry to record specific start and end times. Fields include:
Date: day of the punch.
Time: start (and optionally end) time.
Location: where you worked.
Punch Type: choose how the punch is classified (Automatic, In, Out, Start Break, End Break, In (Start Shift)).
Time Code: classification for the hours.
Notes: optional description.
Add Entry: add another punch segment for the same day.
Duration (Hrs)
Use Duration to enter a flat number of hours without start and end times. The following fields appear:
From / To: start and end of the date range for the hours.
Hours: total hours worked.
Time Code: classification for the hours.
Location: work location.
Is an Adjustment: indicate if the hours correct a prior pay period.
Notes: optional description.
What Happens Next
Your added time appears in the timesheet immediately.
Saving and approving the timesheet sends it to your manager or administrator for review and approval.
Depending on configuration, you or your supervisor may receive notifications about the approval status.
Once approved, the hours are included in payroll calculations for the pay period.
Need Help?
If you have questions or experience issues, contact WorkEasy Support at (888) 783‑1493, email support@workeasysoftware.com, or submit a support ticket.